This project explores home security by creating a door sensor with Raspberry Pi Pico H. Using a magnetic reed switch, Pico H can detect door status and send alerts to a connected device. Easy to set up, this project introduces security solutions that can be expanded to include multiple sensors for home automation.
Introduction to the Smart Home Door Sensor Project
Home security is a top priority for many people, and smart home technology can make it more accessible. With a smart door sensor, you can keep track of the status of your doors in real-time. This project uses the Raspberry Pi Pico H and a magnetic reed switch to detect when a door is open or closed. By creating this simple setup, you’ll learn how to read sensor data and trigger alerts, providing an introduction to smart home automation.
Components Needed for the Project
To build a smart home door sensor, you’ll need the following components:
- Raspberry Pi Pico H: The microcontroller used to read sensor data and process alerts.
- Magnetic Reed Switch: The core sensor for detecting door open/closed status.
- Magnet: Positioned on the door to interact with the reed switch.
- Resistor (10kΩ): For signal stability.
- Jumper Wires: To connect the components.
- Breadboard: For easy circuit assembly.
These basic components are affordable and readily available, making this an ideal beginner project for those new to home automation or microcontrollers.
Understanding the Magnetic Reed Switch
A magnetic reed switch is a simple, cost-effective sensor that consists of two metal contacts inside a glass capsule. When a magnet is placed near the switch, the contacts close, completing the circuit. In this project, the reed switch will be mounted on a door frame, and the magnet will be positioned on the door. When the door opens, the magnet moves away from the switch, breaking the circuit and indicating that the door is open.
Setting Up the Raspberry Pi Pico H with MicroPython
MicroPython is an ideal programming language for working with the Raspberry Pi Pico H. Start by connecting your Pico H to your computer via USB and opening Thonny IDE. In Thonny, set the interpreter to “MicroPython (Raspberry Pi Pico).” If MicroPython isn’t already installed on your Pico H, follow the setup prompts to flash the firmware. Once complete, you’re ready to start programming.
Wiring the Magnetic Reed Switch to the Raspberry Pi Pico H
The reed switch will be connected to the Pico H’s GPIO pins. Here’s how to wire it:
- Reed Switch Terminal 1: Connect to GP15 on the Pico H (or any other GPIO pin).
- Reed Switch Terminal 2: Connect to the ground (GND) pin through a 10kΩ pull-down resistor.
This setup allows the Pico H to detect when the reed switch is open or closed by reading the GPIO pin’s state. When the door is closed, the GPIO pin will read HIGH (since the circuit is closed); when the door is open, it will read LOW.
Writing the Code to Read the Reed Switch State
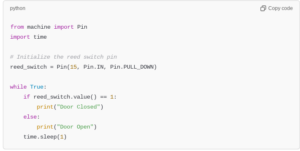
The following code reads the state of the reed switch and prints the door status to the console. If the circuit is open, it will display “Door Open,” and if the circuit is closed, it will display “Door Closed.”
This code continuously reads the state of the reed switch and prints the corresponding status to the console every second.
Setting Up Alerts with an LED Indicator
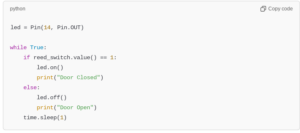
For real-time feedback, you can add an LED to indicate the door’s status. Connect an LED to GP14 with a 220Ω resistor to the ground. The LED will light up when the door is closed.
This code turns on the LED when the door is closed and off when it is open, providing a visual alert.
Adding a Buzzer for Audible Alerts
To add an audible alert, connect a piezo buzzer to GP16. The buzzer will sound when the door is opened.
Now, the buzzer will alert you audibly when the door is opened, enhancing security.
Adding a Timer to Prevent False Alerts
If you want to avoid false alerts, you can add a delay so that the buzzer only sounds if the door remains open for more than a set time.
This code introduces a delay to check if the door remains open for 3 seconds before triggering the buzzer.
Sending Notifications via Wi-Fi
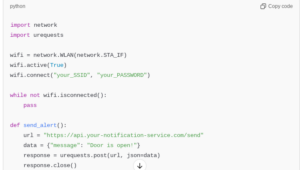
If you want remote alerts, you can add an ESP8266 or ESP32 Wi-Fi module to send notifications to your phone. Connect the Wi-Fi module to the Pico H, and program it to send a message or email when the door is opened.

This code sends a notification when the door is opened. Replace "your_SSID", "your_PASSWORD", and the url with your Wi-Fi credentials and notification service URL.
Adding Battery Power for Portability
To make the door sensor system portable, use a 5V battery pack to power the Raspberry Pi Pico H. Simply connect the battery pack to the USB port, ensuring it has sufficient capacity for extended use. This setup allows you to place the door sensor at any door without needing an external power source.
Testing the Door Sensor System
Testing is essential to ensure the door sensor works reliably. Place the sensor and magnet on your door frame and open and close the door multiple times to check if the system responds accurately. Fine-tune the code, threshold values, or sensor position if necessary.
Expanding the System with Multiple Sensors
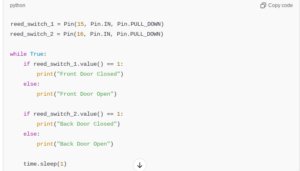
To monitor multiple doors, add additional reed switches and magnets, each connected to a different GPIO pin on the Pico H. Update the code to read each pin separately, and print the status of each door.
This code monitors the status of two doors independently.
Integrating with a Smart Home System
If you have a smart home system like Home Assistant, you can integrate the door sensor. By connecting the Pico H to your Wi-Fi, you can send status updates to your smart home platform, which can trigger actions like activating cameras or sending notifications.
Troubleshooting Common Issues
Common issues include inaccurate readings, unstable Wi-Fi connections, or false alerts. Check all connections, ensure stable placement of the reed switch and magnet, and test the Wi-Fi configuration. Adjust the sensor placement and fine-tune the code if the sensor is not consistently detecting the door status.
Enhancing the Project with Additional Features
Consider adding more features, such as:
- Low Battery Alert: If using battery power, you can add a low battery alert.
- Logging Data: Record door open/close events to a log file on an SD card or send the data to a cloud platform.
- Voice Alerts: Integrate a voice module to announce door status.
These enhancements add versatility and make the system more practical for real-world applications.
Building a smart home door sensor with the Raspberry Pi Pico H is an excellent way to get started with home automation and microcontroller projects. This setup provides an affordable, effective solution for monitoring door status, with options for local alerts and remote notifications. By experimenting with additional features and integration options, you can expand the system to suit your security needs, transforming a simple door sensor into a comprehensive smart home security solution.
Please check out our other website, where you can learn how to 3D print some of the things needed for this project. https://master3dp.com/


